A Primer on Git
This post is just a simple primer on Git and how I would recommend leveraging it to improve productivity as an engineer. It’s something I wish would have been around when I first started using it, but hopefully you find it useful.
DISCLAIMER: This post is targeted at engineers. If this is your first time interacting with Git, I’d recommend starting with the gittutorial.
The Bare Minimum
What is Git? Git is a distributed version control system(VCS) that tracks changes to files in a content-addressable filesystem. It is important to characterize Git as distributed because it keeps a copy of the entire dataset(repository) locally. Git has 3 main stages:
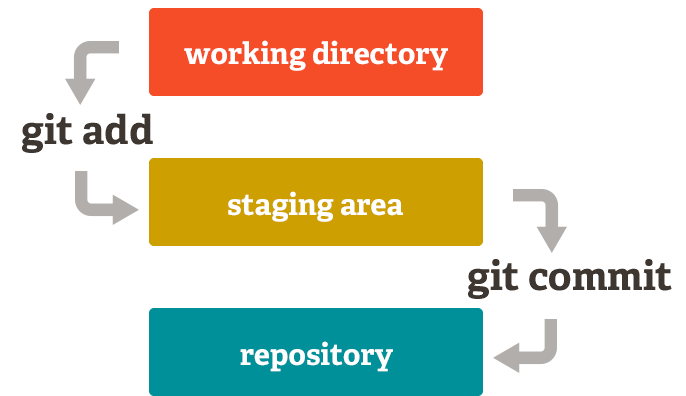
- Modified => the file in your Git repo has changed but is not committed to your local database yet
- Staged(
git add) => the file that is modified is marked as ready to move to the next commit snapshot - Committed(
git commit) => the data(file deltas) are safely stored in the local Git object database
Setting Up an Example
The following sets up a directory(sample-repo) and runs git init, which
creates a .git directory with the required subdirectories.
$ mkdir sample-repo && cd sample-repo

$ git init
Initialized empty Git repository in /Users/louis/sample-repo/.git/

# create an object(file) for git to track
$ echo "# Git Primer\n\nThis is a sample file\!\n" > README.md

# view the contents of the .git directory
$ ls -F1 .git/
config
description
HEAD
hooks/
info/
objects/
refs/
Adding Objects to the Staging Area
Unlike the other systems, Git has something called the “staging area” or “index”. This is an intermediate area where commits can be formatted and reviewed before completing the commit (git-scm)
Adding objects to the staging area is very easy. Git has a super simple status
command to output the changes that it detects and even offers advice for how to
add these objects to the staging area.
$ git status
On branch main

No commits yet

Untracked files:
  (use "git add <file>..." to include in what will be committed)
        README.md

nothing added to commit but untracked files present (use "git add" to track)
To add the README.md to our staging area, just run git add README.md. You
could also run git add ., which adds all files in the filesystem to the
staging area. You should now see a hashed git object in our local Git folder:
$ git add README.md

$ find .git/objects -type f
.git/objects/cd/5248b519c57f2d80cd0ec240e23c7f90f992bb

# view the contents of the hashed object
$ git cat-file -p cd5248b519c57f2d80cd0ec240e23c7f90f992bb
# Git Primer

This is a sample file!
Now, let’s make an edit to our file. If you append a line to the README.md,
Git will detect the change:
$ echo "This should trigger a new version\n" >> README.md
$ git status
On branch main

No commits yet

Changes to be committed:
  (use "git rm --cached <file>..." to unstage)
        new file:   README.md

Changes not staged for commit:
  (use "git add <file>..." to update what will be committed)
  (use "git restore <file>..." to discard changes in working directory)
        modified:   README.md
As you can see above, there are two versions of the same file. There is one
version that is in the staging area(ready for commit) and there is another
version not even staged for commit(not in the staging area). Run git add . to
add the new version of README.md to the staging area. Funny enough, there will
be a whole new object created:
$ find .git/objects -type f
.git/objects/39/1aaae4041bccd74a5ef7cbcc8829bb849bb8f1
.git/objects/cd/5248b519c57f2d80cd0ec240e23c7f90f992bb

# view the first version of README.md
$ git cat-file -p cd5248b519c57f2d80cd0ec240e23c7f90f992bb
# Git Primer

This is a sample file!

# view the latest version of README.md
$ git cat-file -p 391aaae4041bccd74a5ef7cbcc8829bb849bb8f1
# Git Primer

This is a sample file!

This should trigger a new version
Creating a Commit
Creating a commit in Git takes the objects(files) in the staging area and stores that snapshot into the Git directory. Commits expect a message applied to them and an identity to embed into the commit itself. You can commit by running:
$ git commit -m "initial commit"
[main (root-commit) a5b087d] initial commit
 1 file changed, 6 insertions(+)
 create mode 100644 README.md

 # view the new commit object
 $ git cat-file -p a5b087d
tree 7a7affd88353e0551dbc720e17c4e382cc4f6924
author Louis Lefebvre <louis@gmail.com> 1760640521 -0500
committer Louis Lefebvre <louis@gmail.com> 1760640521 -0500

initial commit

# view the commit object with log
$ git log
commit a5b087def21d7f5549ef253a7af845ebb1615035 (HEAD -> main, origin/main)
Author: Louis Lefebvre <louis@gmail.com>
Date:   Thu Oct 16 13:48:41 2025 -0500

    initial commit
A Quick Side Note
If you’re a savvy developer and have been following along, you may have noticed
that there were two new objects created with the git commit command:
$ find .git/objects -type f
.git/objects/a5/b087def21d7f5549ef253a7af845ebb1615035
.git/objects/39/1aaae4041bccd74a5ef7cbcc8829bb849bb8f1
.git/objects/cd/5248b519c57f2d80cd0ec240e23c7f90f992bb
.git/objects/7a/7affd88353e0551dbc720e17c4e382cc4f6924
This is due to git commit combining the creation of a tree object and a commit
object to the Git object database, but this is beyond the scope of this post.
Feel free to read up on the internals of Git objects if you’re interested!
Collaborate Leveraging Remotes
Now having this VCS locally is great! But it really isn’t as useful if you can’t
backup this database on another device and share it with your friends. This is
where those beloved git push and git pull come into play. But first, you
need to create a remote.
Adding a New Remote
There are many ways to create a Git repository, so I’ll provide a quick link with GitHub as it seems to be the most popular option. Once you have a remote repository, copy the URL.
Remote repositories represent another instance of the distributed Git database,
but it is hosted on the internet. To add your first remote to your Git instance,
run the git remote add command. Since this is our first remote, we are
aliasing the remote with the default shortname origin.
$ git remote add origin https://github.com/louislef299/sample-repo.git

$ git remote -v
origin  https://github.com/louislef299/sample-repo.git (fetch)
origin  https://github.com/louislef299/sample-repo.git (push)
Now that our remote is setup properly, we can update our remote object database
with the git push command. Since this is our first time pushing to the
repository, I’m also going to add the remote shortname and the name of the
branch to push:
$ git push origin main
Enumerating objects: 3, done.
Counting objects: 100% (3/3), done.
Delta compression using up to 10 threads
Compressing objects: 100% (2/2), done.
Writing objects: 100% (3/3), 282 bytes | 282.00 KiB/s, done.
Total 3 (delta 0), reused 0 (delta 0), pack-reused 0 (from 0)
To https://github.com/louislef299/sample-repo.git
 * [new branch]      main -> main
branch 'main' set up to track 'origin/main'.
Cloning an Existing Project
Since we were the initial contributors to our remote repository, we didn’t have to clone or pull any changes before pushing. Very quickly, if you are going to clone a repository, you are basically creating a local copy of the Git database and the tracked filesystem. When you pull, you are both fetching the remote Git object database locally and reconciling any differences between you filesystem and the new file versions.
To demonstrate these concepts, I’m going to clone the remote repository into a
new directory called sample-repo-clone with the repository URL I created when
I created the first remote:
$ git clone https://github.com/louislef299/sample-repo.git sample-repo-clone \
   && cd sample-repo-clone
Cloning into 'sample-repo-clone'...
remote: Enumerating objects: 3, done.
remote: Counting objects: 100% (3/3), done.
remote: Compressing objects: 100% (2/2), done.
remote: Total 3 (delta 0), reused 3 (delta 0), pack-reused 0 (from 0)
Receiving objects: 100% (3/3), done.

# validate that all the previous commits are pulled in
$ git log --oneline
a5b087d (HEAD -> main, origin/main) initial commit
Push New Changes
Next, let’s push up a new change to our project! For fun, let’s create a
hello world program in Lua: echo "print(\"hello, world\!\")" >> main.lua.
I’ll let you add, commit and push your changes to the remote
repository yourself. Feel free to reference the above documentation if you get
stuck. Afterwards, change directories back to the original sample-repo
directory(cd ../sample-repo).
You’ll notice that the Lua script isn’t present:
$ ls
README.md

$ git log --oneline
a5b087d (HEAD -> main, origin/main) initial commit
This is because you need to pull down the changes from the remote object
database locally! This can be achieved with git pull:
$ git pull
remote: Enumerating objects: 4, done.
remote: Counting objects: 100% (4/4), done.
remote: Compressing objects: 100% (2/2), done.
remote: Total 3 (delta 0), reused 3 (delta 0), pack-reused 0 (from 0)
Unpacking objects: 100% (3/3), 283 bytes | 25.00 KiB/s, done.
From https://github.com/louislef299/sample-repo
   a5b087d..e617f78  main       -> origin/main
Updating a5b087d..e617f78
Fast-forward
 main.lua | 1 +
 1 file changed, 1 insertion(+)
 create mode 100644 main.lua

# verify that the git commit history is as expected
$ git log --oneline
e617f78 (HEAD -> main, origin/main, origin/HEAD) hello, lua
a5b087d initial commit

$ ls
main.lua        README.md
Conclusion
This was a very quick introduction to Git from my perspective. If anything was confusing or didn’t make sense, let me know! Also, please refer to the authoritative documentation to answer any lingering questions you may have.
Want more Git commands? ohshitgit(s/o Chris) is a great scenario-based resource to bookmark.